Remember that feeling of scrolling through Instagram, seeing those gorgeous nail designs and thinking "I could never do that"? You're not alone. Most beginners assume nail art requires professional training or expensive tools, but that's the biggest misconception holding people back. The truth is, with a few basic supplies and simple techniques, you can create stunning designs right at your kitchen table. By the end of this guide, you'll know exactly which tools to buy, how to master three beginner-friendly designs, and avoid the common mistakes that ruin first attempts.
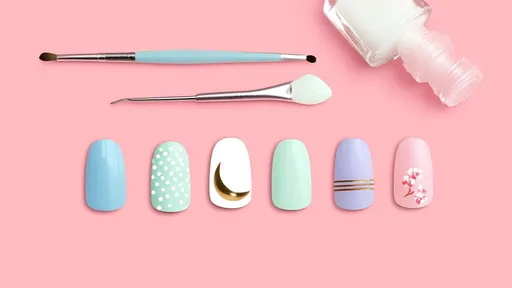
Essential Tools That Won't Break the Bank
Before we dive into techniques, let's talk about what you actually need. Skip the expensive salon-grade equipment—beginners do best with just five basic items. A simple dotting tool (toothpicks work perfectly), striping tape, a thin brush, base coat, and your favorite nail polish colors are all you need to start. Many people make the mistake of buying elaborate kits with tools they'll never use, when really, the magic happens with these fundamentals. I started with just three polishes and a bobby pin as my dotting tool—some of my favorite early designs came from that minimal setup.
The Perfect Canvas: Nail Prep Matters More Than You Think
Here's where most beginners slip up—they jump straight to design without proper preparation. Clean, shaped nails with a smooth base coat make all the difference between a design that lasts a week versus one that chips in two days. Gently push back cuticles, lightly buff the nail surface, and always apply a thin base coat before starting your design. One client of mine struggled with her polish peeling until she started spending just two extra minutes on prep—now her designs last twice as long. Trust me, this step separates amateur-looking results from professional-quality manicures.
Design One: Polka Dot Perfection
Let's start with the easiest technique that looks far more complicated than it is. After your base coat dries completely, choose your background color and apply two thin coats. Once that's dry, dip your dotting tool (or toothpick) into a contrasting color and gently press onto the nail. The secret? Don't overload the tool with polish—less is more. Create random patterns or orderly lines—both look fantastic. When I first tried this, I made the classic mistake of using too much polish, which created messy blobs instead of perfect circles. Wipe your tool between dots for crisp results every time.
Design Two: Easy Stripes With Secret Helpers
Straight lines seem intimidating until you discover striping tape. Paint your base color and let it dry completely—this is crucial. Place the tape in any pattern you like: diagonal, horizontal, or crisscross. Paint over the tape with your second color, then immediately peel off the tape while the polish is still wet. Voila! Perfect stripes without shaky hands. For those without tape, here's a hack: use the edge of a gift card or business card dipped in polish and gently pressed against the nail. It creates clean lines while the polish is still tacky.
Design Three: The Magical Marble Effect
This water marble technique looks like professional salon work but requires zero artistic skill. Fill a small cup with room-temperature water, then drop alternating colors of polish into the water. They'll spread into circles—use a toothpick to gently swirl through the colors creating a marble pattern. Slowly dip your finger into the design, holding it for three seconds before lifting out. The leftover polish will stick to your finger—just peel it off after drying. My first attempt was messy, but after three tries, I created designs that friends assumed came from a high-end salon.
Fixing Common Beginner Frustrations
We've all been there—the design was perfect until you smudged it reaching for your top coat. Here's how to avoid the top three beginner headaches. First, always wait longer than you think between layers. If you're impatient, use quick-dry drops or blow gently on your nails. Second, clean up mistakes with a small brush dipped in acetone—perfect edges make even simple designs look professional. Third, seal everything with a quality top coat, wrapping the tip of your nail to prevent chipping. These small adjustments transformed my nail art from "nice try" to "wow, you did that?"
Beyond Technique: The Joy of Creative Expression
What surprises most beginners isn't just learning new skills—it's discovering how ten minutes of creativity becomes personal meditation. There's something profoundly satisfying about looking down at your hands and seeing tiny works of art you created yourself. This isn't about achieving Instagram perfection; it's about the confidence boost when someone compliments your nails and you get to say "thanks, I did them myself!" The best part? Unlike many hobbies, nail art gives immediate results you carry with you everywhere.
Your Next Steps Toward Nail Art Confidence
Starting simple doesn't mean staying simple. Once you've mastered these basic techniques, you'll naturally begin experimenting with color combinations, adding glitter accents, or trying gradient effects. The key is beginning where you are with what you have—perfection comes with practice, not magic tools. Pick one design this weekend and give yourself permission to make mistakes. Your first attempt might not be perfect, but it will be yours. Share your creations with friends, and remember: every nail artist started with shaky lines and smudged polish. Ready to begin? Your nail art journey starts with that first dot.
By David Anderson/Nov 18, 2025
By Grace Cox/Nov 18, 2025
By David Anderson/Nov 18, 2025
By William Miller/Nov 18, 2025
By Rebecca Stewart/Nov 18, 2025

By Sophia Lewis/Nov 18, 2025
By Rebecca Stewart/Nov 18, 2025
By Ryan Martin/Nov 18, 2025
By Victoria Gonzalez/Nov 18, 2025
By Lily Simpson/Nov 18, 2025

By Sarah Davis/Nov 18, 2025
By Emily Johnson/Nov 18, 2025

By Emma Thompson/Nov 18, 2025

By Megan Clark/Nov 18, 2025
By Daniel Scott/Nov 18, 2025

By Noah Bell/Nov 18, 2025
By Noah Bell/Nov 18, 2025
By Grace Cox/Nov 18, 2025
By James Moore/Nov 18, 2025
By Olivia Reed/Nov 18, 2025